/*Google Analytics*/

Wednesday, August 1, 2012

What's inside my Electric Brewstick Controller box?

After deciding to go all-electric for my  BIAB brewing setup, I considered how to control the heatstick.  I wanted something more than an ON/OFF switch. or simply plugging/unplugging the brewstick from the outlet.

Originally, I did not consider a PID as adding a thermocouple into the mix was over-complicating things in my view.  I settled on a design that was detailed in the Homebrewtalk forum and used a small circuit card to control a solid state relay which switched power to the heatstick.

The picture below shows the semi-rat's nest inside my box.  One day I hope to clean it up a bit. My apologies for not having it all prettied up like many of the other projects I have seen detailed.


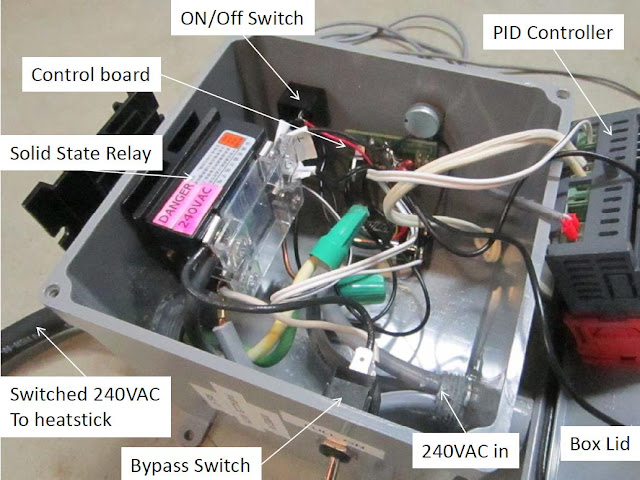
The first version of this box used the Control Board to turn on the relay every so often based on the setting of the potentiometer (round silver component on far side of box).  By turning the knob on the outside of the box (connected to the potentiometer), I could control whether the heatstick was on for 1 second every 12 seconds, all the way up to 11.5 seconds of every 12 second interval.  The relay switched one of the 2 phases of 120VAC to the heatstick, effectively turning it on and off.

This worked OK during mashing (although still not ideal), but to get my pot up to boil, I needed the heatstick on all the time.

To accomplish this I added the Bypass Switch (shown above) that bypasses the relay, and (when turned ON) keeps the heatstick on continuously.  Once I got to a boil, I turned this off, and went back to the timer (technically a variable duty-cycle) approach circuit to control the heatstick.

Since the heatstick is so powerful (5500W), I could not keep a constant boil using the timer circuit.  The instant the timer switched off the heatstick the boil would stop.  So I decided to buy one of the PIDs so often seen in homebrew projects to see if that would improve the boil as well as the mash temperature control.  Mine was around $20 on ebay and displays temperature in degrees C.

With the PID installed, I was able to control temperature quite nicely by dropping the thermocouple into my pot and setting the digital controller (PID) to the desired temperature.

I no longer need the Controller Board in the box, but have left it there because it provides a 9V voltage source that the PID uses to switch the relay on and off.  I could replace it with a pull-up resistor, but I haven't gotten around to it yet.

I did want to mention that I do have a ground wired through the box, and connected to the metal shank of the heatstick.  The other protection that is the most important part of the system is the 2-pole GFCI circuit breaker that I installed in my breaker panel.  This is what will save me if a short happens, as it did already once (my heatstick was not sealed properly with enough J-B weld...had to re-seal it..no problems since.)  GFCI breakers monitor current flow in each circuit (i.e. both phases of 120VAC going to my box/heatstick) and if there is ever a difference (meaning there is a short to ground somewhere in the circuit) of as little as 2-3mA between their currents, the breaker trips.

While the heatstick uses 240VAC, the way this is delivered is via 2 different phases of 120VAC that look like 240VAC to the heatstick.  So, while you'll notice I have a warning sticker on the top of my relay saying 240VAC, it is actually only 120VAC going through the relay.  The other phase of 120 is wired through the box directly to the heatsticks second terminal.  

Below is a functional block diagram of the entire box, including the unused Controller Board.

Here is a picture of the top of the control box.  Of course, I ordered a PID with Celcius readout, and I never did memorize that conversion formula....something like 9/5 times temp plus 32?  or is that minus 32?


Here is the box with associated wiring/connections.  to the right is the thermocouple.  The short white 120V plug at the bottom powers the PID.  The gray 220VAC plug brings power into the box, and the black 10-3 cable coming out the top left is wired into the heatstick.


As I did in my last post, my disclaimer here is that I am not a licensed electrician, and if you are not knowledgeable about electricity/electronics you should consult one.


If anyone wants more details, let me know.

This setup has been working great for me.  I love the fact that I don't have to worry about running out of propane, and I can brew indoors in my basement shop in the winter, or during inclement weather.

I know that the efficiency of a heatstick tops propane burners, as all of the energy from the heatstick goes right into the water.

Thanks again to the entire brewing community for all of the ideas that I've borrowed from to end up with my system!


If you're gonna be serious about brewing, we recommend these essential books:


Wednesday, July 25, 2012

The secret behind my Electric Brewstick

I get strange looks at my brewclub when I mention Brew-in-a-Bag.  No one knows what it is.  One guy in the club came up to me last Saturday and asked me about my "Brew-in-a-Curtain".  My mention of using a voile curtain panel earlier in the week must have stuck with him....or maybe he was just ribbing me....

Anyway...as if being a BIAB'er is not strange enough, I also do not use a propane burner as my heat source.  Instead I use a heatstick.  Not many in my brewclub know what that is either, so I'm basically the red-headed step-child in these parts of the brewing world!

Believe me, I'm trying to evangelize the BIAB method to all of my co-brewers, but I think my best chance at winning converts is with the extract brewers who are eyeing up the move to All-Grain brewing, but that's another topic for another day.


Today and tomorrow, I'm going to uncover the secrets inside my electric brewstick and the controller electronics that drive it.  Most of my design is based on concepts from two sites:
1. How to Build an Electric Hombreweing Heatstick page (thanks Tom), and
2. The Electric Brewery (thanks Kal)

They each went to great lengths to layout in detail how to build an electric-based brewing solution and did a great job.

Along with these sites, I also spent hours scouring the Homebrewtalk website as well to see what others had done and how.  The innovative ideas and willingness to share them is incredible among homebrewers!

My version (shown below) takes "elements" of both Kal's and Tom's designs to make what I feel works best for me as a single-vessel hardcore Brew-in-a-Bag'er.


 Here are my thoughts on how I settled on my final design:

1.  The first design (shown below) is a handheld brewstick made from standard plumbing parts and an 2000 Watt electric water heater element. 


I like this handheld design because it keeps the brewstick separate from the pot/keggle.  Other designs have the element mounted in the bottom of the pot.  I was not sure how easy it would be to clean the keggle with the heater element permanently mounted in the pot so I decided to go handheld.

Also, I use a garden hose to spray off my pot both inside and out, and I was concerned that somehow eventually water would find its way into the electrical/mounting box, and that's never a good thing.

Finally, if I ever wanted to use a different pot, a handheld design gives me that flexibility without the need to drill a mounting hole and worry about leaks.

This design allows the user to simply plug in the heatstick to a standard outlet (with an appropriately sized breaker!) to get things heating/boiling.  A temperature control was not part of this design, so the user simply plugs and unplugs the brewstick as needed to attain/maintain temperature.

2.  The second design (shown below) uses a 5500W (240VAC) Camco water heater element mounted through the side of the pot with a waterproof box on the outside to protect the electrical connections.


 Now this baby will get your water up to temperature quickly (it's more than twice the wattage of the other design), but does require a bit of engineering on the electrical side to make sure that you have enough current available to run it full blast.  I calculated that I'd need about 23 Amps at 240VAC.  This requires 10AWG wire, and a 30Amp double pole GFCI breaker in your panel.   This is no place to skimp on cost.  Get a double-pole GFCI breaker and install it!  It could save your life if you ever have a ground fault in your system.

(Disclaimer:  I am not a licensed electrician, and cannot assume any liability should you damage your house wiring, cause a fire, or worse, injure or kill yourself if you copy any of these designs.  Consult a qualified electrician if you don't know your way around electricity and AC wiring)

The element I used is similar to the one shown, but without the curves.  It is an ultra-low watt density (ULWD) element, meaning that it will not burn out as quickly if you plug it in without water around it.

I decided that it was worth the extra hassle and cost of having my local electrician install a 240VAC outlet in my shop, and a double-pole 30Amp GFCI breaker in my panel in order to allow use of a heating element that would quickly get my water/wort up to strike/boil temperature in a reasonable timeframe.

To get my heatstick to lay fairly flat on the bottom of my pot, I tried to find out if these Camco elements are bendable.  After a few emails with Camco, I decided to give bending a try, but to keep the bends gentle based on their recommendation.  I ended up with what you see below, and it's been doing fine for the last 6 months and about 6 batches.
It sits nicely on the bottom of the pot, and with the 2 sections of the element spread apart, it stays balanced pretty well.

Incidentally, the handheld design I reference above uses J-B Weld to seal around the water heater element, as well as the electrical connections inside.  I used it also, but did not use enough initially, and had to re-seal it by using more J-B Weld to get a complete seal.  Since then, it's worked great.  I've read a few online discussions about the safety of J-B Weld.  It is supposed to be non-toxic, and can survive 500 Deg F.  I've never had a problem with it flavoring my beer either.

Tomorrow, I'll discuss the control box I have built to regulate the temperature in my BIAB setup.

Until then.....cheers!


If you're gonna be serious about brewing, we recommend these essential books:


Tuesday, July 17, 2012

Why AL is my new pal

I thought I had the perfect brew setup.  I had a converted keg that served as my single vessel BIAB solution.  My electric heatstick system was working flawlessly, and my homemade voile bag was getting the job done.  My plate chiller worked great, and I had fine-tuned my process to get my hot wort down to pitching temperature with an in-line thermometer assembly.  Life was PERFECT!


Then it happened....I saw it on Homebrewfinds.com one day 2 weeks ago....a 10 Gallon aluminum stock pot for just $41.  Did I need it?  No, but man it sure was tempting.  I was getting tired of lugging that big old keg around that weighs 20+ pounds.  Not only was it a bear empty, but with 7.5 gallons of water in it there was little chance I could lift it to the top of my brew stand.  And clean up would be a breeze....no more reaching way down in that keg trying to loosen that nasty hot break, or hops that was seemingly welded to the sides.

So I took the plunge and bought one.  Two weeks later it had made its way across this great country by land from California.  Upon opening it, I was amazed and disappointed all at once.  It was light as a feather, and nice and shiny-new, but the advertisement had said it came with a steamer basket which was curiously missing.  I was hoping that the basket would give me a way to pull my bag of grains out without too much squeezing.  No luck...I'm corresponding with the company now to see what went wrong.

In no time I had drilled a hole for the ball valve and verified that my voile bag should fit.  There was no reason not to give her a try the next day, as I had just bought grains to brew up a New Glarus Spotted Cow clone.

Here is how the set up looks during mash, not a whole lot different from before, but with the pot being shorter and wider, it's a bit easier to keep an eye on things.


Hit my temps dead on with my high tech electric brewstick with digital controller.
152F for 60 mins, and 170 mashout for 10.  I drew a few quarts of wort out of the bottom and recirculated it into the bag several times to keep the temperature even.  No need for a $150 March pump!  Thanks Bob Stempski!


With the mash finished and the bag drained, the boil begins:


And when it's time to drain the pot, my plate chiller is clamped just under the table surface:


I recently started using some leftover voile to serve as a filter of the wort as it goes into the funnel/fermenter.  This also helps aerate the wort.  The hot break and hops that make it into the voile will actually clog it up, so having a large piece allows me to slide it around as this happens.


Cleanup was a dream also.  Just a quick brushing and rinsing, and I'm ready for next time.

I did have to modify my siphon tube afterwards by adding an extra copper piece so that it extends to the edge of the pot.

The only other change I need to make is to start with about a half-gallon more water.  The larger diameter of this pot allowed more boil-off and I only ended up with 4.5 gallons of wort.  I had been starting with about 7.4 Gallons, and will now need about 8 gallons.

I use Beersmith, and I had to go into the Equipment section and play around with the numbers to get it right.

So until I find a new way to improve things, I think my setup is perfect.

If anyone has questions, please feel free to post them below.  I have been thinking of making a few videos to discuss my process/setup so let me know if that would be of interest, or if you have other topics you'd like me to take a shot at.

Until next time....cheers!

Tuesday, June 19, 2012

Keeping BIAB The Way It Should Be - Simple

One of the problems with being an engineer is that you always want to find a new way to tinker with things, whether that means adding technology to your home, automating something, or just replacing older technology (i.e. replacing halogen lights with LEDs) to save money.

It's because of this tendency that I don't think I'll ever be able to make a living doing something mundane, no matter how much money it makes me.  This carries over into my brewing as well.  The beauty and simplicity of the Brew in a Bag method runs counter to all of the high-tech complexity that gets my enginerdy juices flowing.

I keep trying to find ways to improve the BIAB process, but all of them add complexity that is unneeded.

After all, isn't the big advantage of BIAB is that it's SIMPLER than the traditional all-grain method(s)?

Could it be that there is nothing to be improved with the Brew in A Bag method?  Say it ain't so!

Here are some of the "problems" I want to solve that I've realized don't really need solving:

1.   Maintaining uniform temperature during mashing is difficult
         
      In my quest for a cool high-tech system, I added a digital temperature controller to my heatstick so that
my mash temperature would be automagically maintained.  Here's a diagram showing it:


Surprise!  The grain bag might as well be a brick wall.  It does such a good job of insulating the interior of the grain bag, that putting the temperature probe in the grain will keep the (digitally controlled) heatstick on for a good long time; long enough to kill any enzymatic activity on the outer edges of the bag.

But alas, if you put the temperature probe at the bottom of the vessel near your heat source, you really have no idea what temperature the grain is at.  So the lesson here is that while a digital temperature controller is nice to have, you really don't need it during mashing if you simply:
        a.  Heat your water to slightly above mash temperature
        b.  Add your grains and stir well
        c.  Wrap your vessel with a blanket or sleeping bag.

It's that simple....the temperature of your grain should remain very close to the desired mash temperature, and if you need to adjust it upward, just apply some heat (propane or heatstick), drain a few quarts out of the bottom and pour it into the grain bag.

BobBrews illustrates this on his site at: http://www.stempski.com/biab.php
Thanks Bob!


2.   Too much wort is left in the grain bag after mashing

     In an effort to maximize my efficiency, I started thinking about how to get more of the wort to drain out of the bag.  Earlier, I posted that I was going to test my theory that the weight of the grain bag causes inward forces on the grain which inhibits the drainage of wort from the bag.

I asked the biabrewer.info community for feedback and got some great responses.  You can read them here.

The consensus in the brewing community seems to be that the amount of wort lost (undrained/absorbed) in the grain is less with BIAB than in Single Infusion Mashing (.6 liter/kg versus 1 liter/kg of grain), so the mash efficiency contribution from this factor should favor BIAB. 

Two things play into this.  The grain bag provides a porous surface over a majority of the grain allowing wort to drain out.  This compares to a much smaller surface (typically the bottom of the grain bed) in a mash tun/cooler.  And secondly, the inward squeezing force the bag applies to the grains, combined with intentional squeezing many BIAB'ers do pushes more of the wort out.  This squeezing does not happen when using a cooler/rigid mash tun.

I am still contemplating the negative side effects of squeezing.  I'm not talking about tannins here, as pH and temperature are the causes of tannin release.  I'm talking about the compaction of the grains that happens during squeezing that might trap wort in the grain much like a stuck sparge.

I think there may be ways to get slightly more of the wort out, but this just adds complexity and the big advantage of our beloved BIAB method is that it is SIMPLE.  So keep it simple by hanging the bag and letting it drain, or spin it around to squeeze even more out.  You'll still be ahead of the game compared to the alternatives.

3.   Grain needs to be finely crushed to hit OG number

If the grain is finely crushed, more surface area is exposed to the water, and the enzymatic conversion of the malt starches to sugars will happen more completely.  But the downside is that the smaller particle sizes of the grains allow them to be compacted into a less porous glob, trapping that precious wort inside.  From what I've read and my personal experience, the crush should crack the grain into several pieces and separate the hull, but there is really no need to overdo it and end up with dust, as it will either end up at the bottom of your vessel, or contribute to poor bag drainage.

Keep it simple and use the crush as done by your local brewshop.

Until next time...cheers!


Monday, June 11, 2012

The satisfaction of brewing

 Well, my oldest son got married to his wonderful and beautiful new wife this Saturday here in Maryland.  My contribution was....you guessed it....3 kegs of homebrew:  2 of a Blue Moon clone, and 1 of Yuengling clone (my first lager).


I had it all brewed in plenty of time, but struggled to figure out how to serve it.  I did not want picnic taps strewn about a table, so I copied an idea I found on hombrewtalk.com (referred to as a Krute...google it), and came up with this:


It's a simple box made from leftover laminated shelving.  I sanded it to rough up the surface so the spray paint would stick.  The drip tray is a plastic heat vent from Home Depot ($6 I think).  I trimmed down the height of the sides that go into the duct, and then cut a piece of leftover flashing to size and caulked it in place on the bottom. It needs to be deeper for next time...another project!  Since my son is in the Air Force, I thought the F-16 tap handles would be a nice touch. These are die-cast and came from Toys R Us ($15 each).


To clean out the fittings and beer line, I dismantled it a bit, but here are some other looks at it:


The wedding was awesome, and we all had a great time.  I received several compliments on the beer.  One guy who talked to me has been brewing for 7 years, and he could not believe I only had 1 year under my belt.  He loved the Blue Moon clone as did his wife.  He has been using extract kits, and I took the opportunity to evangelize about BIAB.  Maybe he'll find this blog and go "single vessel"!

I had some concerns about the Yuengling lager clone, as I mistakenly put it in to my refrigerator to begin lagering before all of the fermenting had completely stopped.  When I first tasted it, there was a real butterscotch aftertaste.  My local brewshop owner, Tom suggested that I simply take it out of the frig for several days and let the yeast eat up the byproducts causing the off-flavor.  Sure enough, that really helped to clean it up, and I got compliments on it as well.

 So today I'm relishing the satisfaction of having watched my son begin his married life and basking in the warmth of knowing my beer was a success for the big event.

Oh yeah....and only one of the two kegs of Blue Moon clone was consumed, so I've got a full one back here at home for me!

Cheers all!


Thursday, May 31, 2012

Maximizing wort extraction from BIAB

One of my frustrations with the BIAB method is that once mashing is complete, I feel that too much of the wort remains in the bag.  And even though a "stuck sparge" is supposed to be impossible with BIAB, there sure does seem to be too much sweet wort trapped in the grain bag that is unaffected by gravity while it hangs above my keggle.

I've tried spinning the bag to squeeze wort out, and I've put the grain bag in a collander on my keggle and tried to push on it and squeeze as much out as possible without burning my hands.  With either of these methods I can usually hit my numbers, but I'd like to figure out a way to avoid all the squeezing, pressing, etc.

I referred back to John Plamer's How to Brew book to try and get a scientific explanation of the sparging/lautering.  Appendix F of the book discusses the fluid dynamics of water through a traditional cooler mash tun grain bed.  In this case, the grain bed is only being affected by the downward force of gravity.  There is no lateral force on the sides of the grain bed, so the flow resistance is determined solely by the weight of the sparge water flowing through it, and the weight of the grain bed itself.


For BIAB method however, the grain bed/bag is also subjected to the lateral pressures of the grain bag itself, which push the grain particle closer together, increasing the flow resistance for the wort.


To prevent this, I plan to use a cake rack (or similar) to prevent the bag from collapsing around the grain bed as the bag is pulled from the vessel.  I have not determined if placing the rack inside the bag or under the bag is best.


I'm hoping to try this in the next week when I brew up a Gumballhead clone.  I'll report back my findings.

In the meantime, please let me know your thoughts on this and any other ideas you have to allow wort to flow more freely from the bag.

Cheers!


Thursday, May 24, 2012

The challenges of the BIAB method

Today I'm returning to the subject of BIAB specifically as I've just finished brewing a black IPA and am very disappointed with my "numbers" (read OG).

I am committed to BIAB as the best way for me to brew, but I'm learning that there are several aspects of BIAB that present unique challenges as compared to the traditional Single Temperature Infusion method.

They are:

1) Mash Temperature Control,
2) Correct grain crush fineness, and
3) Effective wort extraction from the grain bag.


Mash Temperature Control - The BIAB method presents a challenge in maintaining consistent temperature throughout the vessel.  This is due to the fact that unlike traditional all-grain techniques that use a cooler with no heat source for a mash tun, BIAB typically uses either a propane burner, or electric brewstick as a heatsource available during the mash process. This requires that a buffer zone of water be used to prevent the bag from burning on the bottom of the vessel.  This can result in significant temperature differences between the bottom of the vessel and the mash.  Furthermore, the brew bag (typically made from voile) combined with the grains act as a barrier to the natural flow of water throughout the vessel/grains.

To address these challenges, the BAIB'er needs to do a few things.  First, in a set up such as mine (below) where a digital controller tracks the wort temperature, make sure that the thermocouple/temperature probe is in the buffer zone, or close to the bottom of the vessel.  Here is where the water will be the hottest, and this is where you want to monitor temperature so that you don't get it too hot.


 My keggle setup - note possible temperature differences possible if thermocouple is not in the buffer zone, or regular stirring is not done.


[On a side note, when I started with BIAB, I heated my water to 13 degrees over the desired temperature assuming that the grains would cool things down to the desired mashing temperature (This is the what traditional AG brewers experience when using a cooler).  My experience with this setup has been that the grain causes very little temperature drop.  I have not documented the actual drop, but I know it's a lot less than 13 degrees.]

Second, ensure frequent stirring of the mash to encourage circulation of the water throughout your grain bag, and also to even out the temperature.

Grain Crush/Fineness - My local brew shop owner likes to tease me about being a BIAB'er, and when I purchased my grain bill for this black IPA, he asked me if I wanted him to crush it (knowing that I like a finer crush than his mill is set for).  I let him go ahead, and unfortunately I did not re-crush it on brew day.

All went smoothly with my electric BIAB set up on brew day.  This was the first time I used my "upgraded" control box with a digital temperature controller, and it did fine.
Upgraded Brewstick Control Box

The OG on this fine recipe was supposed to be 1.070, but in the end I had achieved only 1.054.  I think the coarser crush contributed to my low OG.  From now on, I will re-crush at least once, as the worry of a stuck sparge is not an issue with BIAB. I may even try wet milling (spraying the grains a bit in an effort to keep the hulls from splitting apart).  I had heard of this technique, but recently saw it done on a YouTube video here.

Ideally, you want as much surface area of the crushed grain to be in contact with the water during the mash time.  Just as crushed ice cools a drink faster than larger cubes, finely crushed grains will be converted more efficiently because more surface area of the grains is available to the diastatic enzymes to act on.


 Effective Wort Extraction from the Grain Bag - One of the upsides of BIAB is that you don't have to sparge.  This is also one of the downsides, because even though most of the wort drips out of the bag,