/*Google Analytics*/

Tuesday, July 17, 2012

Why AL is my new pal

I thought I had the perfect brew setup.  I had a converted keg that served as my single vessel BIAB solution.  My electric heatstick system was working flawlessly, and my homemade voile bag was getting the job done.  My plate chiller worked great, and I had fine-tuned my process to get my hot wort down to pitching temperature with an in-line thermometer assembly.  Life was PERFECT!


Then it happened....I saw it on Homebrewfinds.com one day 2 weeks ago....a 10 Gallon aluminum stock pot for just $41.  Did I need it?  No, but man it sure was tempting.  I was getting tired of lugging that big old keg around that weighs 20+ pounds.  Not only was it a bear empty, but with 7.5 gallons of water in it there was little chance I could lift it to the top of my brew stand.  And clean up would be a breeze....no more reaching way down in that keg trying to loosen that nasty hot break, or hops that was seemingly welded to the sides.

So I took the plunge and bought one.  Two weeks later it had made its way across this great country by land from California.  Upon opening it, I was amazed and disappointed all at once.  It was light as a feather, and nice and shiny-new, but the advertisement had said it came with a steamer basket which was curiously missing.  I was hoping that the basket would give me a way to pull my bag of grains out without too much squeezing.  No luck...I'm corresponding with the company now to see what went wrong.

In no time I had drilled a hole for the ball valve and verified that my voile bag should fit.  There was no reason not to give her a try the next day, as I had just bought grains to brew up a New Glarus Spotted Cow clone.

Here is how the set up looks during mash, not a whole lot different from before, but with the pot being shorter and wider, it's a bit easier to keep an eye on things.


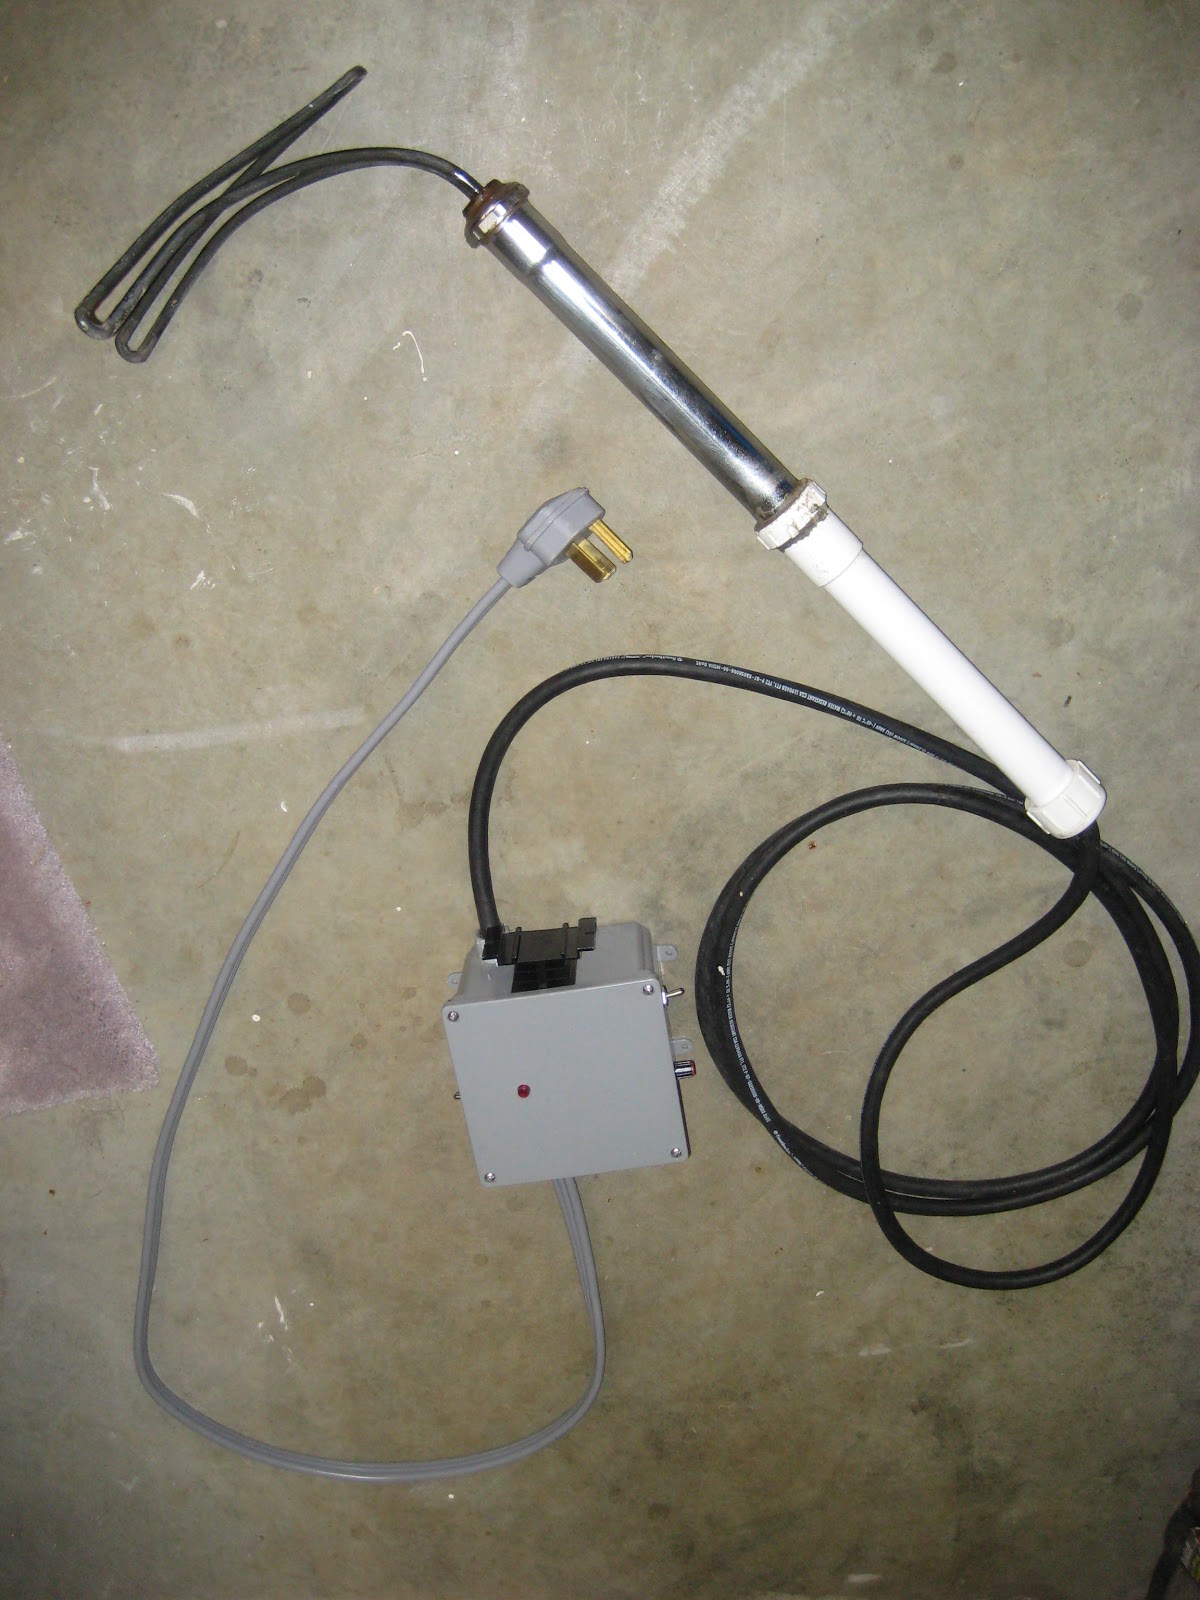
Hit my temps dead on with my high tech electric brewstick with digital controller.
152F for 60 mins, and 170 mashout for 10.  I drew a few quarts of wort out of the bottom and recirculated it into the bag several times to keep the temperature even.  No need for a $150 March pump!  Thanks Bob Stempski!


With the mash finished and the bag drained, the boil begins:


And when it's time to drain the pot, my plate chiller is clamped just under the table surface:


I recently started using some leftover voile to serve as a filter of the wort as it goes into the funnel/fermenter.  This also helps aerate the wort.  The hot break and hops that make it into the voile will actually clog it up, so having a large piece allows me to slide it around as this happens.


Cleanup was a dream also.  Just a quick brushing and rinsing, and I'm ready for next time.

I did have to modify my siphon tube afterwards by adding an extra copper piece so that it extends to the edge of the pot.

The only other change I need to make is to start with about a half-gallon more water.  The larger diameter of this pot allowed more boil-off and I only ended up with 4.5 gallons of wort.  I had been starting with about 7.4 Gallons, and will now need about 8 gallons.

I use Beersmith, and I had to go into the Equipment section and play around with the numbers to get it right.

So until I find a new way to improve things, I think my setup is perfect.

If anyone has questions, please feel free to post them below.  I have been thinking of making a few videos to discuss my process/setup so let me know if that would be of interest, or if you have other topics you'd like me to take a shot at.

Until next time....cheers!

Tuesday, June 19, 2012

Keeping BIAB The Way It Should Be - Simple

One of the problems with being an engineer is that you always want to find a new way to tinker with things, whether that means adding technology to your home, automating something, or just replacing older technology (i.e. replacing halogen lights with LEDs) to save money.

It's because of this tendency that I don't think I'll ever be able to make a living doing something mundane, no matter how much money it makes me.  This carries over into my brewing as well.  The beauty and simplicity of the Brew in a Bag method runs counter to all of the high-tech complexity that gets my enginerdy juices flowing.

I keep trying to find ways to improve the BIAB process, but all of them add complexity that is unneeded.

After all, isn't the big advantage of BIAB is that it's SIMPLER than the traditional all-grain method(s)?

Could it be that there is nothing to be improved with the Brew in A Bag method?  Say it ain't so!

Here are some of the "problems" I want to solve that I've realized don't really need solving:

1.   Maintaining uniform temperature during mashing is difficult
         
      In my quest for a cool high-tech system, I added a digital temperature controller to my heatstick so that
my mash temperature would be automagically maintained.  Here's a diagram showing it:


Surprise!  The grain bag might as well be a brick wall.  It does such a good job of insulating the interior of the grain bag, that putting the temperature probe in the grain will keep the (digitally controlled) heatstick on for a good long time; long enough to kill any enzymatic activity on the outer edges of the bag.

But alas, if you put the temperature probe at the bottom of the vessel near your heat source, you really have no idea what temperature the grain is at.  So the lesson here is that while a digital temperature controller is nice to have, you really don't need it during mashing if you simply:
        a.  Heat your water to slightly above mash temperature
        b.  Add your grains and stir well
        c.  Wrap your vessel with a blanket or sleeping bag.

It's that simple....the temperature of your grain should remain very close to the desired mash temperature, and if you need to adjust it upward, just apply some heat (propane or heatstick), drain a few quarts out of the bottom and pour it into the grain bag.

BobBrews illustrates this on his site at: http://www.stempski.com/biab.php
Thanks Bob!


2.   Too much wort is left in the grain bag after mashing

     In an effort to maximize my efficiency, I started thinking about how to get more of the wort to drain out of the bag.  Earlier, I posted that I was going to test my theory that the weight of the grain bag causes inward forces on the grain which inhibits the drainage of wort from the bag.

I asked the biabrewer.info community for feedback and got some great responses.  You can read them here.

The consensus in the brewing community seems to be that the amount of wort lost (undrained/absorbed) in the grain is less with BIAB than in Single Infusion Mashing (.6 liter/kg versus 1 liter/kg of grain), so the mash efficiency contribution from this factor should favor BIAB. 

Two things play into this.  The grain bag provides a porous surface over a majority of the grain allowing wort to drain out.  This compares to a much smaller surface (typically the bottom of the grain bed) in a mash tun/cooler.  And secondly, the inward squeezing force the bag applies to the grains, combined with intentional squeezing many BIAB'ers do pushes more of the wort out.  This squeezing does not happen when using a cooler/rigid mash tun.

I am still contemplating the negative side effects of squeezing.  I'm not talking about tannins here, as pH and temperature are the causes of tannin release.  I'm talking about the compaction of the grains that happens during squeezing that might trap wort in the grain much like a stuck sparge.

I think there may be ways to get slightly more of the wort out, but this just adds complexity and the big advantage of our beloved BIAB method is that it is SIMPLE.  So keep it simple by hanging the bag and letting it drain, or spin it around to squeeze even more out.  You'll still be ahead of the game compared to the alternatives.

3.   Grain needs to be finely crushed to hit OG number

If the grain is finely crushed, more surface area is exposed to the water, and the enzymatic conversion of the malt starches to sugars will happen more completely.  But the downside is that the smaller particle sizes of the grains allow them to be compacted into a less porous glob, trapping that precious wort inside.  From what I've read and my personal experience, the crush should crack the grain into several pieces and separate the hull, but there is really no need to overdo it and end up with dust, as it will either end up at the bottom of your vessel, or contribute to poor bag drainage.

Keep it simple and use the crush as done by your local brewshop.

Until next time...cheers!


Monday, June 11, 2012

The satisfaction of brewing

 Well, my oldest son got married to his wonderful and beautiful new wife this Saturday here in Maryland.  My contribution was....you guessed it....3 kegs of homebrew:  2 of a Blue Moon clone, and 1 of Yuengling clone (my first lager).


I had it all brewed in plenty of time, but struggled to figure out how to serve it.  I did not want picnic taps strewn about a table, so I copied an idea I found on hombrewtalk.com (referred to as a Krute...google it), and came up with this:


It's a simple box made from leftover laminated shelving.  I sanded it to rough up the surface so the spray paint would stick.  The drip tray is a plastic heat vent from Home Depot ($6 I think).  I trimmed down the height of the sides that go into the duct, and then cut a piece of leftover flashing to size and caulked it in place on the bottom. It needs to be deeper for next time...another project!  Since my son is in the Air Force, I thought the F-16 tap handles would be a nice touch. These are die-cast and came from Toys R Us ($15 each).


To clean out the fittings and beer line, I dismantled it a bit, but here are some other looks at it:


The wedding was awesome, and we all had a great time.  I received several compliments on the beer.  One guy who talked to me has been brewing for 7 years, and he could not believe I only had 1 year under my belt.  He loved the Blue Moon clone as did his wife.  He has been using extract kits, and I took the opportunity to evangelize about BIAB.  Maybe he'll find this blog and go "single vessel"!

I had some concerns about the Yuengling lager clone, as I mistakenly put it in to my refrigerator to begin lagering before all of the fermenting had completely stopped.  When I first tasted it, there was a real butterscotch aftertaste.  My local brewshop owner, Tom suggested that I simply take it out of the frig for several days and let the yeast eat up the byproducts causing the off-flavor.  Sure enough, that really helped to clean it up, and I got compliments on it as well.

 So today I'm relishing the satisfaction of having watched my son begin his married life and basking in the warmth of knowing my beer was a success for the big event.

Oh yeah....and only one of the two kegs of Blue Moon clone was consumed, so I've got a full one back here at home for me!

Cheers all!


Thursday, May 31, 2012

Maximizing wort extraction from BIAB

One of my frustrations with the BIAB method is that once mashing is complete, I feel that too much of the wort remains in the bag.  And even though a "stuck sparge" is supposed to be impossible with BIAB, there sure does seem to be too much sweet wort trapped in the grain bag that is unaffected by gravity while it hangs above my keggle.

I've tried spinning the bag to squeeze wort out, and I've put the grain bag in a collander on my keggle and tried to push on it and squeeze as much out as possible without burning my hands.  With either of these methods I can usually hit my numbers, but I'd like to figure out a way to avoid all the squeezing, pressing, etc.

I referred back to John Plamer's How to Brew book to try and get a scientific explanation of the sparging/lautering.  Appendix F of the book discusses the fluid dynamics of water through a traditional cooler mash tun grain bed.  In this case, the grain bed is only being affected by the downward force of gravity.  There is no lateral force on the sides of the grain bed, so the flow resistance is determined solely by the weight of the sparge water flowing through it, and the weight of the grain bed itself.


For BIAB method however, the grain bed/bag is also subjected to the lateral pressures of the grain bag itself, which push the grain particle closer together, increasing the flow resistance for the wort.


To prevent this, I plan to use a cake rack (or similar) to prevent the bag from collapsing around the grain bed as the bag is pulled from the vessel.  I have not determined if placing the rack inside the bag or under the bag is best.


I'm hoping to try this in the next week when I brew up a Gumballhead clone.  I'll report back my findings.

In the meantime, please let me know your thoughts on this and any other ideas you have to allow wort to flow more freely from the bag.

Cheers!


Thursday, May 24, 2012

The challenges of the BIAB method

Today I'm returning to the subject of BIAB specifically as I've just finished brewing a black IPA and am very disappointed with my "numbers" (read OG).

I am committed to BIAB as the best way for me to brew, but I'm learning that there are several aspects of BIAB that present unique challenges as compared to the traditional Single Temperature Infusion method.

They are:

1) Mash Temperature Control,
2) Correct grain crush fineness, and
3) Effective wort extraction from the grain bag.


Mash Temperature Control - The BIAB method presents a challenge in maintaining consistent temperature throughout the vessel.  This is due to the fact that unlike traditional all-grain techniques that use a cooler with no heat source for a mash tun, BIAB typically uses either a propane burner, or electric brewstick as a heatsource available during the mash process. This requires that a buffer zone of water be used to prevent the bag from burning on the bottom of the vessel.  This can result in significant temperature differences between the bottom of the vessel and the mash.  Furthermore, the brew bag (typically made from voile) combined with the grains act as a barrier to the natural flow of water throughout the vessel/grains.

To address these challenges, the BAIB'er needs to do a few things.  First, in a set up such as mine (below) where a digital controller tracks the wort temperature, make sure that the thermocouple/temperature probe is in the buffer zone, or close to the bottom of the vessel.  Here is where the water will be the hottest, and this is where you want to monitor temperature so that you don't get it too hot.


 My keggle setup - note possible temperature differences possible if thermocouple is not in the buffer zone, or regular stirring is not done.


[On a side note, when I started with BIAB, I heated my water to 13 degrees over the desired temperature assuming that the grains would cool things down to the desired mashing temperature (This is the what traditional AG brewers experience when using a cooler).  My experience with this setup has been that the grain causes very little temperature drop.  I have not documented the actual drop, but I know it's a lot less than 13 degrees.]

Second, ensure frequent stirring of the mash to encourage circulation of the water throughout your grain bag, and also to even out the temperature.

Grain Crush/Fineness - My local brew shop owner likes to tease me about being a BIAB'er, and when I purchased my grain bill for this black IPA, he asked me if I wanted him to crush it (knowing that I like a finer crush than his mill is set for).  I let him go ahead, and unfortunately I did not re-crush it on brew day.

All went smoothly with my electric BIAB set up on brew day.  This was the first time I used my "upgraded" control box with a digital temperature controller, and it did fine.
Upgraded Brewstick Control Box

The OG on this fine recipe was supposed to be 1.070, but in the end I had achieved only 1.054.  I think the coarser crush contributed to my low OG.  From now on, I will re-crush at least once, as the worry of a stuck sparge is not an issue with BIAB. I may even try wet milling (spraying the grains a bit in an effort to keep the hulls from splitting apart).  I had heard of this technique, but recently saw it done on a YouTube video here.

Ideally, you want as much surface area of the crushed grain to be in contact with the water during the mash time.  Just as crushed ice cools a drink faster than larger cubes, finely crushed grains will be converted more efficiently because more surface area of the grains is available to the diastatic enzymes to act on.


 Effective Wort Extraction from the Grain Bag - One of the upsides of BIAB is that you don't have to sparge.  This is also one of the downsides, because even though most of the wort drips out of the bag,

Wednesday, May 2, 2012

General tips for the beginning brewer

I'm going to deviate from my BIAB slant today to share a few important general tips that will move you into the major leagues of brewing quickly, and keep your beer from having that "homebrew" taste.

Several of my early batches were "good", but still had that slight off-flavor that is not objectionable, but you notice.  All of your friends and family will tell you it's good beer, but you can still see that look on their face after they take the first sip that tells you they're only being half-truthful.  They can tell it's homebrew.

Here are a few things that, if you pay attention to will make your beer much better.

1.  Fermenting temperature - Many beginning homebrewers think that sitting their carboy or plastic bucket in the corner of the living room or a closet with a towel over it is good enough.  WRONG!  I did this initially, but finally realized that it was too warm there.  My wife and daughter really like the house warm in the winter, and I'm forced to crank the heat up to 75 Deg F.  While the yeast will survive at 75 deg with no problem, at this temperature the yeast are in overdrive, and produce a several by-products that will affect the taste of your beer.  If you want learn the nitty-gritty about what the yeast produce, check out the Yeast book on my Recommended Books page.

Even if you keep your thermostat at a lower temperature, you'd be surprised at how much variation there can be. I significantly improved my beers by setting up a water bath system as shown below.

What you're looking at is (aside from a 6 gallon carboy full of Blue Moon wheat clone) a plastic storage bin filled with water, with a 300W aquarium heater (similar to a Fluval E 300-Watt Electronic Heater) and submersible pump (like this one: Active Aqua Submersible Water Pump 160 GPH ).  The heater is on the left with the green end cap.  The pump can't be seen but is attached to the rear wall of the bin.  Also floating around in there is a thermometer that I monitor temperature with.  The black straps you see are my Brew Hauler (The Brew Hauler - Carboy Carrier ).  I have this sitting in my shop which stays at around 55-65 degrees F.

There are other heaters available, but make sure that the one you pick is adjustable down to 68 degrees F or lower.  I chose a 300 W heater based on a formula in Chapter 4 of the Yeast book mentioned above.  The beauty of this set up is that the heater will keep the water at the proper temperature and the pump keeps the water circulating so that the temperature is even throughout.

Temperature variations in your fermenter will affect the yeast in a bad way.  You want to keep a constant temperature, and I have had good success with this arrangement.

2.  Yeast Starters - One of the big things I learned by reading the Yeast book is the importance of pitching the correct amount of yeast.  You need to have enough yeast introduced into your wort so that it moves from the Lag phase to the Exponential Growth phase within 15 hours.  In most cases, this means that you'll need to make a starter, as the number of yeast cells contained in your dry yeast packet, or liquid yeast vial is not going to be enough.  In general, the rule for calculating yeast cell counts is

(1 million) X (milliliters of wort) X (degrees Plato of the wort)

(I've taken this formula from the Yeast book mentioned above)

In some cases, the yeast cell count in the packet or vial you purchase can be less than half of the optimal cell count needed to get your wort fermenting properly in the desired timeframe.

Making a yeast starter is the solution, as it is simple and prevents the yeast from making high levels of diacetyl and acetaldehyde which contribute off-flavors to your beer.

I will not get into the process of making a yeast starter here, as there are numerous well-done explanations of the process including this one by John Palmer from his book How to Brew: Everything You Need To Know To Brew Beer Right The First Time.

While these tips are not specific to Brewing in a Bag, I wanted to share my thoughts here, as it took me longer than it should have to figure these things out.  I hope these help you get to the major leagues of homebrewing quickly!

Until next time....Cheers!

Tuesday, May 1, 2012

Electric heating system

In this post, I'll lay out the details of the electric (heatstick) based system that I have been using.  As I mentioned in my previous post, an electric system was what I settled on after considering a propane system.


There seems to be some trepidation in the brewing community regarding systems that involve water and electricity, and with good reason.  If you don't have your system properly designed and installed it could mean a nasty shock at the least, and death at worst.  Without a good understanding of electricity, putting together an electric heating system is a daunting task, and is probably one reason why propane is more popular, at least for now.


Since my background is in electrical engineering, I was somewhat less intimidated with this approach, although I have to admit that I still had to do a lot of reading to convince myself that I wanted to embark on this path.  I had seen several sites that described a heatstick constructed of a water heater element attached to several standard 1-1/2" drain pipe components.  Most used 120VAC elements which was convenient for plugging into a standard outlet.  I was more interested in a higher wattage element that would be capable of quickly bringing 5-10 gallons of water up to mash temperature (~150 Degrees F) in a reasonable time (10-15minutes).  These higher wattage elements required 220VAC, similar to what your electric clothes dryer needs, meaning that I'd need to have a 220VAC outlet installed where I wanted to brew (my basement shop and my garage).  Also, I wanted a way to vary the heatstick output so I needed a way to either vary the voltage or the duty-cycle.  I chose the latter after reading a thread on Homebrewtalk.com that detailed how a Pulse-Wave Modulator circuit board from Bakatronics could be used to turn on and off a solid-state relay (you'll want this heatsink too) to control the heatstick.  The picture below shows a box from HomeDepot that I used to mount the circuit board and the solid stat relay.


Without going into all the details, I ended up with the system shown below, which (with one exception) has serverd me well in the last 6 months of brewing.
You'll notice that I decided to bend the water heater element 90degress so that it lays on the bottom of my keggle.  I emailed Camco before I did this and got this response:
The element sheath is made from Incoloy 840 and the interior is filled with a highly compacted ceramic powder. Bending an element creates gaps in the ceramic that cause high temperature spots. A tighter bend radius gives larger gaps. The larger the gaps are, the higher the temperature will be. High temperatures will reduce the life of the element. If the bend is too tight the element will crack. Too address the difficulties, we use specialized bending equipment and compression dies that we have developed just for these elements.
I don’t recommend bending the element, but if you can't find a way around it, use the largest bend radius possible.


The heatstick is placed into my keggle as shown below
In order to keep the grain bag from being burned by the heatstick, I settled on a 10" stainless steel vegetable steamer to act as a false bottom in the keg as shown below


As you can see from the photo below, I used some stainless steel bolts to serve as feet that hold the steamer several inches off the bottom of the keggle


I've recently purchased a digital temperature controller that I plan on using to control the heatstick in lieu of the PWM circuit board I now use.  More details on that to follow.


In my next post, I'll discuss a few important tips for beginning homebrewers that I learned about the hard way including temperature control of the fermenter, and proper yeast pitching.


Until then...so long for now.....